Blog

How I Started My Mobile Coffee Business

I have had a few people ask recently what it took to design, build and run a mobile coffee truck and the specifics about the equipment I used. It’s not just putting a coffee machine in a camper van. There are lots of routes to get there and lots of decisions to be made in the process but ultimately it depends on where you want to be selling your coffee, how focussed on quality you want to be and how many coffees you want to be able to make a day.

First we’ll answer a few questions about the “where” so we can learn from my shortcomings with Pascal, then we’ll understand the necessities you need in order to get your environmental health rating, then we’ll finally move to how you want to power everything.

First Question: Where are you selling?

Do you have a location in mind already? Have you got an agreement to set up in a static location or do you need to travel? Do you need to travel short distances or are you wanting to widen your reach and be able to travel across the country?
My mistake: Buying a van that had a limited reach.

Yes, I admit it, Pascal (My 40 year old Citroen H van) was less than ideal for any job that was further than 20-30 miles away. With a top speed of around 40mph and about 15 miles per gallon fully loaded, it was expensive, long and stressful making trips to outside of a certain radius. Some other companies tow their vintage vehicles around or put them on trailers, which is fine if you have another large towing vehicle.

If I could do it again: I’d pick something less vintage and more sturdy for long distances to allow me to go into London and around the South Coast. Maybe I would put in a horse box, which is popular method, but not as easy to manoeuvre into some of the tight spots that I had to with Pascal.

What you need to decide on: How far do you want to be able to travel, and how manoeuvrable do you need to be when you get there.

Second Decision: Quality is King

There are obviously some overlap and limitations for some of the above, for instance, you can take a coffee cart all over if you can store it in a van but you are limited to indoor events, and many events won’t allow a van indoors.

As you’re on my coffee blog, you obviously have some interest in creating the best coffee possible in any environment, and some environmental factors can really affect the quality of your coffee, whether it’s hot and humid or cold and windy, if you can’t offer protection to your machine from the elements you risk the quality of your coffee being substandard.

I attended many events where the rain would be falling sideways, meaning I might need to close the hatch of the van earlier than I wanted to, (or even in some cases, I was contracted to). I had pipes freeze on me overnight, high winds creating a coffee ground tornado inside my cab and soaring heats meaning I couldn’t keep the temperatures down on my espresso machine. Basically I had a window of perfect conditions where I could create the ‘perfect’ espresso. Every other time I was battling the elements to produce a quality product.

But you move up your desire to create high quality coffee, you up your requirements of power for the better machine, the better grinder, a level pitch and a protected environment to prepare your coffee.

You could build a cart with an urn and serve instant coffee, and these are the types of competition you will find when you are specialising in coffee. Many food carts will serve coffee, so you need to be able to provide the best possible product going, otherwise you will find people might as well getting a coffee from the donut stall for £1.50 because bad coffee might as well be cheap.

I focussed on making coffee that was honestly as good as possible, which meant having a coffee machine that was as consistent as it was reliable, the best grinder my off-grid electrical system could provide power to, in-line water treatment, and enough room to weigh out, measure and dial in on a regular basis (especially important when you are dealing with fluctuating conditions). Some might say, to my detriment, but I know I was proud of every coffee I served and, even now, since selling the business, is something I can still stand by, I never let quality drop.

Third Decision: How are you going to power it all?

This is either a really simple question or the hardest one of all. I have created a table below that covers almost all of the advantages and disadvantages of your choice process.

Again it depends on where you are looking to serve coffee about how important some of these advantages and disadvantages are to you, so once you work that out, you can try to understand how important some of those factors are.

Fourth Question: What Equipment do you Need?

This is the big one, what equipment would you need to start a mobile coffee business wholly depends, (again) on where and how you want to serve your coffee. But the fundamentals are the same. You need a source for water, a place to store waste water, a source for power, a place to measure and grind coffee and, finally, a way to brew it.

I will assume you want to focus on the main type of coffee delivery, which is an espresso machine pulling delicious espresso, from which you can make the ever popular milk drinks like lattes and flat whites. You need two sinks with a way to wash your hands with hot water.

Espresso Machine
Most commercial espresso machines require a 3-phase electrical supply, which isn’t practical for mobile setups. In a van, you’ll usually be choosing between:

High-voltage 240v machines, often with high amperage demands

Gas-powered machines, which heat the boiler using LPG but still require some electric input (typically 240v)

Manual lever machines, which can be partially muscle-powered, but still require some heating (gas or electric)

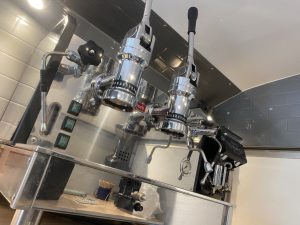
What I use: La Pavoni Vasari 2 Group Dual Fuel Lever arm Coffee Machine

Grinder
All grinders run on 240v, and a good burr grinder is non-negotiable for quality espresso. It’s a thirsty piece of kit, often one of the first things that’ll highlight any weakness in your power setup.

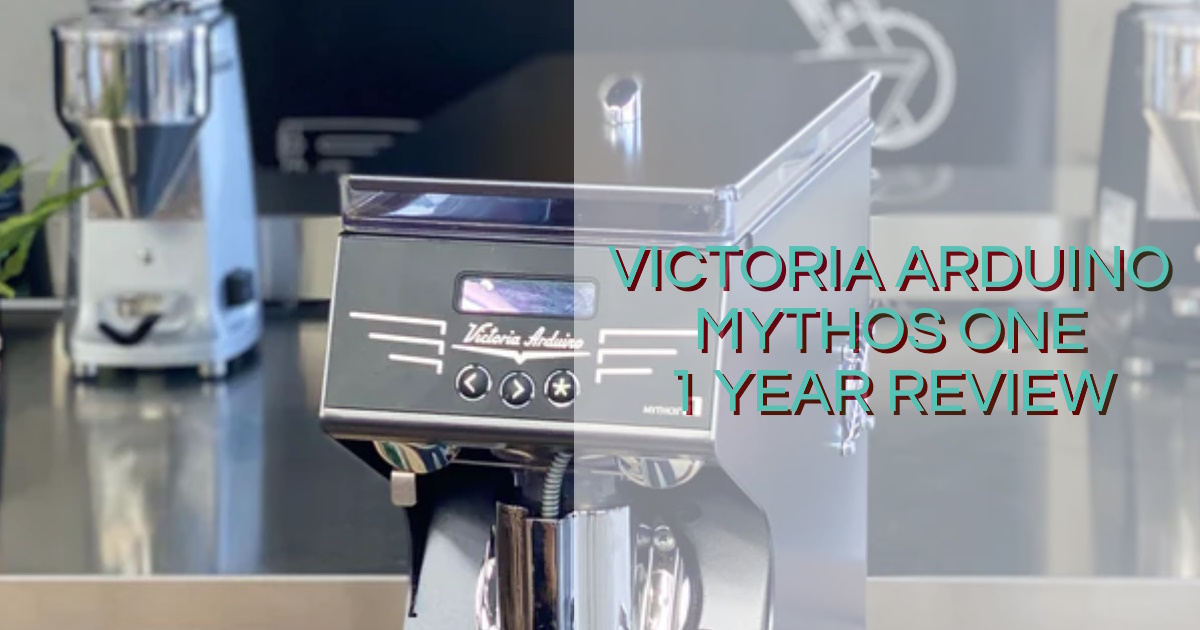
What I use: Victoria Arduino Mythos One as my main espresso grinder and a Compak K3 Grinder for my decaf

Water Pump
You’ll need a pump to pull water from your tanks to the espresso machine and hand wash.

12v pumps are common in van setups and can run off the leisure battery

240v pumps are more powerful but add to your overall AC draw

What I use: A 12v Shurflo pump paired with an accumulator for smoother flow. On my portable mobile coffee cart, I use a FloJet which plugs into mains.

Fridge
Keeping milk and other perishables cool is a must, but options are limited:

12v compressor fridges are efficient but can struggle on hot days or after long service

240v fridges perform better but use significantly more power

What I use: I use neither and used a Igloo Maxcold Cooler box that if efficiently primed would keep my milk well below the 4 degrees required and used zero power.

Lights
Interior lighting is essential for early mornings and gloomy days.

12v LED lighting is the most efficient and can run directly from your leisure battery

240v lighting can be overkill unless already part of your setup

What I use: I wired up my spotlights to my 240v ring

Hot Water for Hand Washing
You’ll need a setup to comply with hygiene regs. Options include:

12v heaters, which are low-draw but slow and often inadequate

240v water heaters, which are much better but heavy on power usage

What I use: A small Triton 240v over sink water heater

What Espresso Machine do I want for a Mobile Coffee Business?

Here you have two options, if you are always planning on being connected to a power source, then this job is easy, and you can choose any espresso machine that takes your fancy, if you are wanting to be a little more off grid, then your options are much slimmer. If you go pure electric, then this increases the cost of your energy storage and an inverter, almost prohibitively so, both in terms of price, and where you can actually store the things that will take up the size of a medium fridge. Your space is at a premium, so this is important to consider.

So what is the answer to this? Well, dual fuel allows you to heat the water in the espresso machine with gas, and then there are two further options, either Butane, or LPG that you will need to store in a locked box and will require you to have a Gas Safety check once a year.

On the plus side it’s fairly straightforward to install, I used a 6Kg Gas-It refillable tank, which I could fill at a petrol station that sold LPG, I later bought a second one.

Using this, I could reliably heat my water for around 25 hours per 6KG, it costs less than a tenner to fill it up, so it was a really efficient power/cost to the number of espressos I could produce.

But then you still have the question of how you produce pressure, internal pumps, automatic and semi automatic machines require power, and if you want to be able to run everything, then there was only one option.

The Mighty Lever Arm Machine

Lever machines produce the pressure required to force the water through the puck of coffee by pulling the lever down which depresses a spring, you have to manually account for your preinfusion time, and then you release the lever which releases the spring, forcing the water through the puck of coffee at around 9 bars.

Yes it’s manual work, but the pressure profile of lever arm is amazing (you can read about me wax lyrical of how much I loved my espresso machine here) and with no electrical pumps and gauges, there are much fewer parts to go wrong or break. Which, again is an advantage when you are out on the road, subjecting your machine to the rigours of public roads with speed bumps and potholes galore.

So to conclude this section, if you are going to be setup in a fixed location with a constant source of power, then choose whatever espresso machine you want. If you are going to be even remotely off grid, then you need a Lever Action – Dual Fuel espresso machine. You may be tempted by a fracino, but please don’t. Get something built from the home of espresso in Italy.

Other Equipment You might need

The list is not exhaustive and doesn’t include things like plumbing, wiring, sockets and etc, but will give you the basis of essential all assuming, like me, you are working off grid.

    • Inverter: Converts 12v battery power to 240v. Pure sine wave inverters are best for sensitive electronics.
      I used a 2000W 12V Pure Sine Wave Sunshine Power Inverter C-Series


    • Leisure battery bank: Deep-cycle AGM or lithium batteries to power your 12v and inverter systems.
      I started with 120ah AGM batteries which was more than enough for day to day then upgraded to a Victron 200ah Lithium


    • Solar panels: Helpful for topping up batteries, especially in summer.
      I had a 300w flexible solar panel on the roof.


    • Solar MPPT: To charge the batteries from the solar you need an MPPT.
      I had a 30A MPPT Charge Controller first off which charged my AGM batteries, then when I upgraded to Lithium, I had a Victron 100/30 Smart Solar Controller


    • Charge Controller: I also had a charge controller that I could charge my batteries by plugging into the mains.


    • Till/iPad POS: I used my phone with a Zettle pad which was usually charged via USB or 12v/5v adapter.


    • Water tanks: One for fresh water, one for grey. Mounted securely and easy to fill/drain.
      I used a Slimline Wastemaster located outside of the van to collect grey water.


    • Gas bottle setup: If running a dual-fuel machine or LPG water heater.


That covers everything that requires some sort of planning and installing, other bits like barista equipment is fairly self explanatory. I hope it helps answer some of the many questions I had when starting out my van and building my coffee cart.

I have included Amazon affiliate links where possible in this article so if you have found any of this helpful and was going to buy off Amazon anyway, I would be very appreciative if you would click through on the links throughout.


Real Talk: What you Need to Know About Running A Mobile Coffee Business

There’s a certain allure to taking your coffee business on the road. You imagine the freedom to choose your location, the open-air vibe, and the joy of bringing quality java to the people, no matter where they are. I too was enticed by this vision and after missing out on physical location (the owner turned it into flats) and took my coffee business mobile. While there are plenty of sunny days and satisfied customers, it’s not without its challenges—challenges that differ significantly from a traditional brick-and-mortar setup. Here are some hard-won insights from my own experience that you might want to consider.

Murphy’s Law is Your Co-Pilot: More Things Go Wrong on the Road

Driving your café from location to location subjects your equipment to a level of abuse that it would never see in a static shop. From bumps in the road to constant packing and unpacking, the wear and tear is inevitable. Unfortunately, this means you may find yourself acting more like a mechanic than a barista at times. When catastrophe strikes while you’re serving an eager crowd, you’ll understand the importance of having a toolset and some basic repair knowledge.

Advice: Always carry a toolkit and spare parts. Know your machinery well enough to perform quick fixes that can get you through the day.

Preparation is Not Just Key, It’s Your Lifeline

In a traditional café, if you run out of coffee cups or find your espresso machine acting up, you have a stockroom and perhaps even a nearby supplier. On the road, what you have in your van is *all* you have. Running out of essential supplies is not an option; it’s a day-ender.

Advice: Overpack, within reason. Carry backups for critical equipment and supplies. Make a comprehensive checklist and tick items off as you load them.

The Quest for the Perfect Spot: Finding Events

Finding events that haven’t already been claimed by other coffee stands is an exhausting rite of passage. It often involves relentless networking, relationship-building with event organizers, and a little bit of luck. Being on standby to fill in for another vendor at the last minute can sometimes be your foot in the door. Day trading is a tough ask and even though you can find yourself a serene location somewhere, regular visitors are harder to come by.

Advice: Develop strong connections in the event circuit. Be flexible and willing to step in last-minute, but also discerning enough to recognize potentially unprofitable events.

Beware the Money Pit: Some Events Will Make You Lose Cash

Even with the best planning, there will be events where you end up making a loss. From days of preparation to wasted product and unpredictable weather, the list of things that can go wrong is endless. Furthermore, nothing hits harder than when two big events are scheduled for the same day, and you have to choose. The opportunity cost of choosing one event over another is a daunting task, at which point refer to the lifetime earning potential of a particular event.

Advice: Set aside a contingency fund to cushion the financial blows for a wasted day. Analyse each loss to learn what can be done differently next time.

The Art of Packing Away: It’s Not Just Wiping Counters

At the end of the day, packing up your mobile café isn’t as simple as locking up a shop. It’s a game of Tetris, fitting boxes and equipment into a confined space in such a way that they won’t shift during transit. It’s physically exhausting and mentally draining and it takes time and repetition to find efficiencies. Get strong, stackable boxes and make sure they fit in with your other bits.

Advice: Optimise your packing routine. Maybe even practice it. Keep your storage containers modular and easy to handle.

The Sardine Can Experience: Working in Confined Spaces

My van has a high roof, but even so, the interior is not what you’d call spacious, especially when there’s more than one person working. Manoeuvring around each other while maintaining efficiency and a cheerful disposition requires a level of choreography not usually needed in a traditional café setting. There will be days when you need an extra pair of hands.

Advice: Consider the ergonomics of your mobile setup carefully. Train your team on best practices for confined-space work to keep things running smoothly.

The Imperfect Pitch: Every Location Has Its Quirks

In the picturesque world of mobile coffee, every parking spot is level, every power outlet is convenient, and you’re always facing the right direction to catch customer traffic. In reality, the perfect pitch is more of an aspiration than a guarantee. You may find that your allocated space is uneven, putting your equipment and even your barista skills to the test. Or perhaps you discover that your power source is too far away, or even non-existent, requiring last-minute adaptations. Facing the wrong way might mean you miss out on peak footfall, affecting your bottom line for the day.

Advice: Carry levelling blocks for uneven surfaces, have a long extension cords for far-off power sources, and always scope out your location in advance if possible. Adaptability is the name of the game in the mobile coffee business; be prepared to improvise when your pitch is less than perfect.

Weathering the Storm: The Sky Isn’t Always Blue for Mobile Coffee Vendors

Running a mobile coffee business means you’re exposed to the whims of Mother Nature in a way that brick-and-mortar shops are not. Unlike a traditional café, where customers can seek refuge from a sudden downpour or gusty winds, your open-air setting could mean a sudden exodus of patrons. A rainy day isn’t just an ambiance killer; it could turn into a financial washout. Then there’s the matter of high winds, which could easily knock over your signage or, worse, unsettle your equipment. And, of course, the question looms: is your setup water-tight enough to withstand a good soaking?

Advice Invest in high-quality, weather-resistant canopies or awnings. Keep a stash of sandbags or weights to secure your setup against winds. Always check weather forecasts in advance and plan accordingly. If possible, design your layout so that customers can still access your service without getting drenched. Being prepared for inclement weather conditions ensures that the elements cause minimal disruption to your operations.

So there you have it—my seasoned perspective on what it’s really like to run a mobile coffee business. It’s rewarding but demanding, exhilarating but exhausting. If you’re prepared to navigate the bumps on the road, you’ll find that the journey is not just about the coffee; it’s also about the incredible stories you collect along the way.

Eureka Oro vs Specialita: Which is Best for You?

When it comes to selecting the right espresso grinder for your home or café, you may find yourself comparing Eureka Oro and the Eureka Specialita. Both of these grinders have impressive reputations in the home coffee world and with many users on Reddit and Instagram rating this as a great grinder for espresso. The Eureka Oro is known for its professional-grade performance and consistency, making it a popular choice for serious coffee aficionados and expert baristas. With a powerful motor and large burrs, it delivers exceptionally uniform grounds that help you achieve the perfect espresso shot. O

On the other hand, the Eureka Specialita is appreciated for its compact design and user-friendliness, which makes it a great option for those who want cafe-quality coffee without dedicating much counter space.

In this article, you’ll discover the key differences and similarities between the Eureka Oro and the Specialita so that you can make an informed decision on which grinder is the best fit for your needs. As you explore their respective features, be sure to consider your personal preferences and how they align with the capabilities of each grinder.

Eureka Specialita vs Mignon Summary

  • For the coffee connoisseur who values precision, robustness, and quiet operation, the Eureka Oro, despite its smaller size and slower grind, provides professional-grade consistency. The Oro may not be well-suited for bustling commercial settings, but it excels as a single-dose grinder in quieter environments, like a home or small office
  • The Eureka Specialita, on the other hand, is praised for its user-friendly design and compact size, making it a strong contender for home baristas, small cafés, or pour-over brew enthusiasts who have limited counter space.
  • When considering grind speed, the Oro outshines the Specialita. However, both provide exceptional grind quality and are relatively quiet, with the Oro slightly leading in the quietness department.
  • Aesthetically, the Oro features a more refined design with a gold-plated finish, whereas the Specialita leans toward an industrial look, available in a variety of colours.
  • Both grinders prioritize durability and offer excellent longevity with proper maintenance.
  • Price-wise, the Oro is typically costlier, but its superior features may justify the price for some. The Specialita provides great grind quality at a more budget-friendly price.
  • In terms of user interface, both grinders have a straightforward, user-friendly design, with programmable buttons and digital displays for easy adjustments. 

Choosing between the Oro and Specialita depends largely on your specific needs and preferences, both grinders offering impressive performance to elevate your coffee experience

Eureka Specialita

Eureka Oro

Eureka Mignon ‘Oro’ Overview

The Eureka Oro is a premium-quality coffee grinder designed to fulfil your grinding needs. With its 65mm flat burrs and silent technology, you’ll experience precise andalmost noise-free grinding that allows you to savour your coffee at its best. Key features include:

  1. Silent Technology: Built to reduce grinding noise and disturbance in your environment
  2. 65mm Flat Burrs: Ensures a consistent and precise grinding experience
  3. Stepless Micrometric Regulation System (SMRS): Enables you to achieve the perfect grind size, tailored to your brewing method, 
  4. High-Speed Maintenance: Easy removal of the top burr, allowing efficient cleaning and maintenance

Suitability – Who is the Eureka Mignon ‘Oro For?

The Eureka Oro, while compact and not the fastest on the market, serves as a commendable option for single-dose grinding Its speed may not match the rigorous demands of a commercial setting, making it a less suitable choice for high volume coffee businesses, maybe it would work as a guest espresso or decaf, with lower demand.

Nevertheless, in a home setting, the Eureka Oro comes into its own. Its quiet operation minimises noise disturbance, which is particularly valuable for those early morning grinds. In addition, its simple cleaning process further enhances the user experience, making it an excellent choice for home coffee enthusiasts who value convenience and quality in their daily brew alongside easier maintenance make this a popular choice.

Eureka Specialita Overview

With the Eureka Specialita, you can enjoy an exceptional grind quality with ease. Key features to note for this powerful grinder include:

  1. 50mm flat steel burrs: These deliver consistent, fine grinds for a superior extraction
  2. Stepless grind adjustment: Allowing you to fine-tune the perfect grind settings for your coffee
  3. ACE system: The anti-static system of the Specialita ensures minimal grind retention, meaning fresher coffee and less waste
  4. Solid build: A sturdy aluminium casing and top-quality components will ensure the longevity of your grinder

Suitability – Who is the Eureka Specialita for?

The Eureka Specialita is an excellent option for various coffee enthusiasts and situations, such as:

Home Baristas: Its durability and precision make it suitable for those who love making high-quality coffee at home

Small Cafés: Its professional build quality and compact size make it perfect for spaces with limited counter space

Pour-Over Fans: The stepless grind adjustment and consistency allows for perfect grinds for your pour-over brews

Overall, the Eureka Specialita caters well to users from diverse backgrounds, offering a reliable and precise grinding solution to enhance your coffee experience.

Grinding Performance Comparison Oro vs Specialita

Speed

When comparing the Eureka Oro and the Specialita, you might notice a difference in grinding speed. The Eureka Oro is known for its faster grinding time, allowing you to process your coffee beans more efficiently. In contrast, the Specialita might be slightly slower in comparison. Keep this in mind when deciding which grinder best suits your needs in terms of time and efficiency.

Grind Quality

In terms of grind quality, both the Eureka Oro and Specialita offer exceptional results. They both feature consistent and uniform grinding, which is essential for producing a great-tasting cup of coffee. However, you may find that the Eureka Oro provides a finer and more precise grind, while the Specialita delivers a more versatile range of grind sizes for different brewing methods. It’s essential to consider your brewing preferences when choosing between these two grinders.

Noise Level

When it comes to noise levels, it’s worth noting that both the Eureka Oro and Specialita are relatively quiet compared to other grinders on the market. They both utilise noise-reduction technologies to minimise the sound produced during operation. However, the Eureka Oro tends to have a slightly lower noise level compared to the Specialita. If noise is a significant concern for you, this difference may be important to consider when making your decision.

Design Comparison

Aesthetics

When comparing the Eureka Oro and the Eureka Specialita, you’ll notice distinct aesthetic differences. The Oro has a more refined and elegant design, with a polished finish and smooth, rounded edges. The Specialita, on the other hand, has a more industrial look, with sharper lines and a slightly bulkier appearance. Both grinders have a sleek metallic body, but the Oro flaunts a gold-plated finish while the Specialita is available in various colours like black, white, and red. Consider your personal preference and how the grinder will fit into your kitchen décor when making a choice.

Size and Dimensions

In terms of size and dimensions, the Eureka Oro and Specialita differ slightly. The Oro measures 320mm in height, 110mm in width, and 225mm in depth, making it a compact and space-saving option. The Specialita, on the other hand, is slightly larger with dimensions of 340mm in height, 120mm in width, and 230mm in depth. While the difference may not be substantial, it’s important to consider the available space in your kitchen when deciding between these two grinders.

Durability

Both the Eureka Oro and Specialita are built with durability in mind, ensuring that your investment lasts for a long time. Having owned the Eureka Zenith HS in the mobile espresso van, we can attest to the build quality of the brand. They feature robust metal exteriors that can withstand daily use and an occasional bump or scrape. Additionally, both grinders have top-quality internal components – such as steel burrs, sturdy motors, and high-precision grind adjustment mechanisms – that provide consistent performance for years to come. With proper care and maintenance, you can trust that either choice will serve you well over time.

Price and Value for Money

When comparing the Eureka Oro to the Specialita, the first aspect you may consider is the price. The Eureka Oro is typically priced higher than the Specialita but only slightly, which poses interesting questions regarding which one offers better value for your money if they are both around the £500 mark.

The Eureka Oro stands out with its larger burrs, more robust motor, and additional grind adjustment options. These features contribute to a consistently high-quality grind, which is essential for achieving the best flavour from your coffee beans. Furthermore, the Oro’s robust build quality and premium materials are designed to last and provide a reliable experience for years to come.

Eureka Specialita Price History

On the other hand, the Specialita is known for its great grind quality and consistency, probably in a busier setting too. Its compact design makes it appealing for home users. The Specialita still offers a good range of grind consistency and adjustments, making it a solid choice for a variety of brewing methods.

Ultimately, your choice between the Eureka Oro and Specialita will depend on your personal preferences and requirements. Consider your budget, your desired grind quality, and how often you plan to use your grinder. Whether you choose the premium Eureka Oro or the Specialita, both grinders offer excellent performance and can enhance your coffee brewing experience.

Ease of Use and Maintenance

Maintaining your grinder ensure it’s longevity and reduces any left over grinds that can cause a bitter taste in the cup if not dealt with on a regular basis. Luckily both of the Eureka grinders are relatively easy to maintain. The 

Cleaning Process

When it comes to cleaning, both the Eureka Oro and the Specialita are quite similar. To keep your grinder working at its best, you should follow these simple steps:

  1. Remove the hopper: Empty the beans and remove the hopper by twisting it counter-clockwise.
  2. Brush the burrs: Use a soft brush to clean the burrs thoroughly, ensuring no residue is left behind. 
  3. Vacuum: To remove any remaining coffee grounds, use a small vacuum or handheld hoover. 
  4. Wipe: Wipe down the exterior of the grinder with a damp cloth to remove any dust or spills. 
  5. Reassemble: Put the hopper back in place, and your grinder is ready for use again.

Remember to perform this cleaning routine regularly to maintain your grinder’s efficiency and longevity.

User Interface

The user interfaces of both grinders are straightforward. The Eureka Oro and the Specialita each have a digital display and control panel allowing you to make adjustments easily. Some key features include:

  • Time-based grinding: Both grinders allow you to set a grinding time, ensuring consistent dosing of your coffee grounds. 
  • Stepless grind adjustment: Both models have stepless grind adjustment, giving you precise control over your grind size. 
  • Programmable buttons: Each grinder has programmable buttons for single and double shots, making your brewing process more convenient.

Overall, both the Eureka Oro and the Specialita are user-friendly, making them a great choice for those seeking ease of use and maintenance.

Repair

As for the repair, the costs can vary depending on the specific part that needs replacing. The burrs can be a significant consideration, given that they wear over time and require replacement to maintain the quality of the grind.

For the Eureka Oro, the official 65mm replacement burrs cost around £99. Given the somewhat unique design of the Oro, there are fewer aftermarket versions available, making it slightly more expensive to maintain in terms of burr replacement.

On the other hand, the Eureka Specialita uses more common 55mm burrs. The official replacements can cost as little as €‎24. There are also upgrades in the form of third-party burrs makes it cheaper to replace and upgrade parts on the Specialita, potentially saving money and improving the functionality of the machine in the long run.

Final Verdict

Considering all of the factors specific to your needs, you may find the perfect grinder between the Eureka Oro and the Specialita. The Eureka Oro might be the right choice if you need a powerful, durable, and reliable grinder with a fast grind time. It offers exceptional grinding consistency, impressive build quality, and a stepless grind adjustment system, making sure you get the finest and most accurate ground coffee every time. Additionally, its silent technology ensures noise-free operation, which is particularly useful in a home or office setting.

On the other hand, the Specialita would appeal to you if you’re looking for a grinder that combines elegance with functionality. Its sleek design is complemented by the touch display, which makes it intuitive and user-friendly. Like the Eureka Oro, the Specialita also offers stepless grind adjustment and low noise levels, but it comes with an added advantage of 55mm flat burrs. These burrs guarantee a better grind quality, ensuring that your coffee retains its flavour and aroma.

Ultimately, your decision should be based on how well these grinders cater to your specific needs. Compare their features, weigh the pros and cons, and choose what suits your preferences and requirements best. Be it the Eureka Oro or the Specialita, either one of these grinders can elevate your coffee-making experience by ensuring you get the perfect cup of coffee that is not only enjoyable but also consistent in its quality.


Eureka Mignon Specialita vs Oro FAQ

What Makes Eureka Oro’s 65mm Burrs Stand Out?

Eureka Oro’s 65mm flat burrs offer exceptional precision and consistency in grinding. The large size contributes to more uniform coffee grounds, critical for achieving a balanced and flavourful extraction. But they are more expensive to replace, costing about £99 for an official pair.

What Sets Eureka Specialita’s 55mm Burrs Apart?

The Specialita’s 55mm flat burrs provide a high-quality grind suitable for various brewing methods. The lower cost for replacements, both official (£85) and third-party versions (as low as £30), makes the Specialita more economical for long-term use.

Why Might One Choose Eureka Oro Over the Specialita?

The Eureka Oro is known for its premium design, enhanced grinding performance, and durability. It offers faster grind time and larger burrs, making it an excellent choice for those seeking superior grind quality and don’t mind the higher price tag.

What Makes the Eureka Specialita a Worthy Investment?

The Specialita is known for its compact design, affordability, and impressive grind quality. It’s ideal for home users who want a high-quality espresso grind without breaking the bank. Plus, its parts replacements are more cost-effective.

How Does Maintenance and Repair Compare Between the Oro and Specialita?

Both grinders require routine cleaning for optimal performance. However, the Specialita may have an edge in repair cost due to its less expensive parts. The Oro’s burrs are more expensive to replace, though they offer superior grinding performance.

The Best Coffee Varietals and Cultivars – What’s the Difference?

The terms “cultivar” and “varietal” are often used interchangeably in casual conversation, but they do have specific meanings in botany and agriculture and when it comes to coffee it is important to know the difference. This is not only to determine the base flavour profiles of different cultivars and varietals, but also other equally important factors such as the growing conditions that are common factors as well disease resistance and sustainability.

The Nuances of Coffee Taxonomy

In coffee taxonomy, Coffea is the genus, and within it, there are several species, such as Coffea arabica, Coffea canephora (robusta), Coffea liberica, and more. Within each of these species, there are further distinctions, often referred to as “varietals” or “cultivars,” which is where some confusion and questions arise like “what is a coffee varietal?” and “what is a coffee cultivar?”.

A coffee varietal is a natural sub-type of a species. For instance, within Coffea arabica, there are naturally occurring varietals like Typica and Bourbon. These varietals happen naturally and have been discovered and named due to their unique attributes.

A coffee cultivar, on the other hand, is a cultivated variety that has been intentionally bred or selected by humans. This could involve cross-breeding different varietals or selectively breeding a varietal for specific traits.

For example, the Pacamara coffee cultivar is a hybrid of Pacas and Maragogipe varietals, created by humans for specific characteristics. In the coffee industry, however, these terms are often used interchangeably. For instance, many people refer to all types of Coffea arabica – whether they’re naturally occurring or human-bred – as “varietals.” While this is not strictly correct from a botanical perspective, it’s common parlance in the world of coffee. But if you want to be scientifically accurate, which if we want the language and study of coffee to mature, natural sub-types are varietals, and human-cultivated sub-types are cultivars.


The coffee family tree

Coffee imports have created an incredibly detailed Coffee Family Tree, which try’s to detail the somewhat complex relationship between varietals, cultivars, species and subtypes which just shows how complicated and nuanced the relationships are in the world of coffee. The author even explains himself that “The information backing where these varieties come from, the providence of a given coffee is really shaky a lot of times. Looking online, you are maybe looking at really one source repeated five times.” which is an inherent problem with the internet that people just repeat what they’ve read elsewhere. 

The genetic relationships between coffee varietals and cultivars are much more complex, often involving backcrossing and multi-generational selective breeding. Additionally, the development of a cultivar might involve multiple parent varietals, so understanding the complex relationship between all the different varieties is almost impossible, and that is before we have even tasted them all!

How Do We Know Which Varietal or Cultivar we are Drinking?

Here is where the complex relationship collides with traceability, coffee importers and roasters want the highest level of traceability to comply with CSR and ESG objectives, to make sure they are using coffee from farms that have sustainable and fair trade practices, but also to provide a level of detail to the consumer and to themselves about the quality of the coffee they are producing. Different cultivars and varietals have flavour profiles that will suit different roasting patterns. This complex world of using repeatable roasting patterns completely falls apart if the roaster doesn’t know what type of coffee they are roasting.

The supply chain of coffee can be even more complicated, at the level of the individual farm or estate, farmers may choose to plant several different varietals or cultivars. For instance, they might plant Geisha for its high cup quality, Caturra for its high yield, and Pacamara for its disease resistance. All these beans could be harvested together and end up mixed in the same batch.

Even within a single varietal or cultivar, there can be genetic diversity due to natural variations and mutations. For instance, even though all the trees might be of the Bourbon varietal, subtle differences between individual trees could result in slightly different beans. These would also be harvested together and mixed in the same batch. When the harvested coffee cherries are sent to a washing station or mill for processing, there’s another opportunity for mixing.

Many washing stations or mills serve numerous smallholder farmers, each of whom might grow different varietals or cultivars. So the cherries from many farms, representing a variety of coffee types, could be processed together and end up mixed in the same lot. Further down the supply chain, exporters and importers might also create blends from different farms, regions, or even countries. They might do this to achieve a specific flavour profile, ensure consistency, or for other reasons.

Some countries, like Ethiopia, have thousands of local, yet to be classified, varietals growing wild. In these cases, it’s common for coffee from one region to be a mix of many different varietals, all of which are usually processed together. By the time green coffee beans are shipped to roasters around the world, they might represent a mix of several different species, varietals, or cultivars of coffee.

This complex mixture contributes to the diversity and complexity of flavours we enjoy in our cups of coffee.

There’s a strong trend towards single-origin coffees and micro-lots. These are coffees from a specific place, often a single farm, and sometimes even a specific part of that farm, and they represent a single varietal or cultivar. This allows roasters and coffee lovers to appreciate the unique characteristics that each coffee type can offer.

The Best Coffee Varietals

Typica and Bourbon are two of the most genetically significant and oldest varietals in the world of coffee. They both belong to the Coffea arabica species, which is known for producing some of the world’s finest coffees.

Typica

Also known as Arabica Typica, it is the base genetic parent for many other varietals and cultivars. Typica originated from Yemen, and then it was spread around the globe during the expansion of coffee cultivation. It’s believed to be one of the first varietals to be cultivated for beverage production. Its influence can be seen in numerous modern varietals and cultivars that trace their lineage back to it. Despite its relatively low yield compared to newer cultivars, Typica is still grown today due to the excellent quality of its beans. Some key typica subtypes to look out for are the following;

  • Kona: This is the Typica variety grown in the Kona region of Hawaii. It’s known for its characteristic bright acidity and rich, medium-bodied flavour. 
  • Maragogipe: This is a mutation of Typica discovered in Brazil. It’s often called “elephant bean” due to the large size of the coffee cherries and beans.
  • Sumatra: Also known as “Java-Nica” or “Jember”, this is a Typica-based varietal grown widely in Indonesia, particularly on the islands of Sumatra and Java. 
  • Creole or Criollo: This is a sub-variety of Typica that is often found in Central and South America. It’s essentially Typica that has adapted to the local growing conditions over generations. 
  • Blue Mountain: This Typica sub-variety is grown in the Blue Mountain region of Jamaica and is known for its mild flavour and high quality. These are all technically sub-varieties of Typica but are often referred to as different varietals due to their unique characteristics and adaptations to their specific growing conditions.

Bourbon

The Bourbon varietal is a natural mutation of Typica. It was first identified on the Island of Bourbon (now Réunion), east of Madagascar, in the Indian Ocean. Bourbon plants are known for their higher yield compared to Typica, although they require more careful cultivation as they’re less resistant to diseases and pests. The beans of the Bourbon varietal are highly valued for their deep sweetness and balanced, complex acidity.

  • Caturra: A natural mutation of Bourbon first discovered in Brazil. It’s a dwarf plant that allows for higher density planting. Caturra is widely grown in Latin America due to its high yield and good cup quality.
  • Catuai: A hybrid of Mundo Novo and Caturra, both derivatives of Bourbon. Catuai is resistant to wind and rain, is compact, and can be planted densely, which makes it an attractive choice for farmers. 
  • Pacas: Found in El Salvador, Pacas is a natural mutation of Bourbon. Like Caturra, it’s a dwarf variety that allows for dense planting. Pacas is highly resistant to disease and has a good yield, which led to it becoming the dominant varietal in El Salvador. 
  • Mundo Novo: A hybrid of Typica and Bourbon first cultivated in Brazil. It combines the high yield of Bourbon with the hardiness of Typica. Mundo Novo plants are large and have a good yield, but they require more time to mature than some other varietals. 
  • Pink Bourbon: This varietal is a relatively rare mutation of the Red Bourbon variety. The beans, which come from a tree with pink-coloured cherries, have won numerous quality awards in recent years. Pink Bourbon is gaining attention for its complex acidity and sweet flavour profile that’s often described as floral and fruity. However, it’s not clear whether Pink Bourbon is a true varietal or just a mutation, as it appears to be genetically identical to other types of Bourbon.

Their contribution to coffee’s genetic diversity and the qualities of beans they produce isn’t debatable. Typica and Bourbon are cornerstone varietals in the history and cultivation of coffee. Their impact can be seen in the lineage of many other coffee varietals and cultivars, some of which combine the desirable traits of these foundational varietals with the robustness, disease resistance, or yield improvements achieved through selective breeding or natural mutation.


Coffee Varietals and Cultivars FAQ

What is the difference between a varietal and cultivar?

In coffee, a varietal refers to the specific type of coffee plant, like Typica or Bourbon. A cultivar, on the other hand, is a variety of coffee plant that has been intentionally created or selected and maintained through cultivation.

What does Typica coffee mean?

Typica is one of the oldest coffee varietals and the base genetic parent for many other varietals. It is known for producing excellent quality beans.

How many coffee varietals are there?

There are over 100 known coffee varietals, but only a handful, such as Typica, Bourbon, Caturra, and Gesha, are widely grown and recognized.

What are Bourbon Coffee beans?

Bourbon coffee beans come from the Bourbon varietal of the Coffea arabica species. This varietal is known for its sweet and complex flavor profile.

Exploring the Finest Barista Coffee Cups in the UK: A Comprehensive Guide


A great cup of coffee is more than just a beverage; it’s an experience; and to truly savour the flavours and aromas of expertly brewed coffee, and when someone thinks of a barista cup, they often see in their minds eye a cup with beautiful latte art, but to get to that point one must choose the perfect vessel. In the United Kingdom, a thriving coffee culture has given rise to an array of barista coffee cups that cater to every taste and preference. In this article, we delve into the world of coffee cups, exploring the best sizes, the heat-retaining benefits of various materials, and the charm of artisanal pottery creations.

The Ideal Sizes for Barista Coffee Cups:

The size of coffee cups can vary significantly across different coffee shops and brands, and this variance plays a crucial role in shaping customer perception. The choice of cup size communicates important messages to customers, influencing their expectations and overall experience. Smaller cup sizes, such as the traditional 8 or 12-ounce cups, are often associated with a focus on quality, precision, and attention to detail. In my opinion, smaller cup sizes provide much less hiding room and suggest that the coffee shop prioritises flavour and craftsmanship, delivering a concentrated and well-crafted beverage.

On the other hand, larger cup sizes, exceeding 12 ounces, can create a perception of value that a 16 oz grande at Starbucks or the 20 ounce Venti.  These cups imply that the coffee shop aims to provide a satisfying and substantial coffee experience, catering to customers who desire a larger portion or a longer-lasting beverage. These are more milk than coffee and in my opinion are sold to mask the taste of mediocre coffee beans and an uncaring process (not all Starbuck’s baristas are uncaring, some are quality baristas).

Ideal Barista Cup Sizes

Here’s a breakdown of the barista cup sizes commonly used for the following coffee drinks:


  1. Espresso: Espresso is typically served in small, demitasse cups. These cups have a capacity of around 2 to 3 ounces (60-90 milliliters). The small size allows for the concentrated shot of espresso to be enjoyed without dilution. 
  2. Macchiato: A macchiato is an espresso drink with a small amount of milk or foam added. It is usually served in a small cup similar to an espresso cup, with a capacity of around 2 to 3 ounces (60-90 milliliters). The small size ensures a balanced ratio between the espresso and the milk/foam topping.
  3. Cortado: Cortado is a beverage made with equal parts espresso and steamed milk. It is commonly served in a small glass or cup, typically with a capacity of around 4 to 6 ounces (120-180 milliliters). The slightly larger size compared to espresso cups allows for a balanced combination of espresso and milk. 
  4. Flat White: A flat white consists of espresso shots topped with steamed milk and a thin layer of microfoam. It is typically served in a cup with a capacity of around 6 to 8 ounces (180-240 milliliters). The slightly larger size accommodates the espresso shots and allows for a well-balanced ratio of espresso, steamed milk, and velvety microfoam. 
  5. Americano: An Americano is made by adding hot water to a shot or double shot of espresso. It is often served in a larger cup with a capacity of around 8 ounces (240 milliliters). The 8-ounce cup size allows for the addition of water while maintaining a balanced flavour profile and allows for a comfortable drinking experience.
  6. Latte: A latte is a milky coffee drink made with espresso and steamed milk, topped with a small layer of foam. It is commonly served in a larger cup, usually with a capacity of around 8 to 12 ounces (240-350 milliliters). The larger size accommodates a higher proportion of milk, allowing for a creamier and more substantial latte experience. 
  7. Cappuccino: A cappuccino is made with equal parts espresso, steamed milk, and foam. It is typically served in a cup with a capacity of around 6 to 8 ounces (180-240 milliliters). The cup’s size ensures a balanced ratio of espresso, steamed milk, and frothy foam, resulting in a harmonious flavour and texture combination.


At AM Espresso, we serve on the smaller end of the above ranges, this is in part due to the van only being able to store a certain amount of milk and water on board and that any larger volumes of milk or water

Choosing the right size for your coffee cup is crucial, as it can affect the taste and enjoyment of your brew. You’ll often see lattes, flat whites and cappuccinos at your local specialist coffee shop almost brimming over the edge, with nothing but the water tension keeping it from spilling over the edges. There is really no set in stone size for each of the different drinks. But there are some popular sizes that baristas and coffee enthusiasts favour and the size that you’ll find in our mobile espresso bar;

Ideal Barista Espresso Cups

These small cups, typically holding 60-90 millilitres (2-3 fluid ounces), are perfect for enjoying a concentrated shot of espresso. Their petite size allows for optimal aroma concentration and easy sipping. The liquid of the espresso is more likely to cool quickly, so factor this into your espresso cup material selection as some materials will retain their heat for longer, if you are after a hot espresso.

Your espresso cups are the first point of call whether you are dialling in some new coffee beans or just using as a receptacle to add to a tall glass for an iced coffee or something. Espresso cups fit under the portafilter and can be stored on top of all but the smallest of espresso machines.

Now there are a few different materials you could buy for your barista espresso cups. of course you could go with the classic ceramic espresso cups, these are the small cups and saucers that you may see, then there is hand-thrown ceramic for the more organic and artisanal vibe.

Growing in popularity of recent years has been double walled borosilicate glass cups which have some thermal property advantages

Our Favourite Barista Espresso Cups

Glass
Steel
Hand thrown
Ceramic


Each of the above barista espresso cups has it’s own use cases and depending on the style of your kitchen, different styles will suit. What can definitely be considered is the durability and cost, all of the above espresso cups cost around £15 apart from the hand thrown ceramic espresso cups (our favourite).

Barista Latte Cups

A good latte cup should have a balanced shape, appropriate thickness for heat retention, a comfortable handle, and a smooth interior surface. These elements contribute to both the latte-drinking experience and the creation of appealing latte art.

When someone thinks of barista cups, they almost definitely think of the a cup with a beautiful latte art on top and even though latte art can be made even in a tomato the cup actually has a big impact on the experience of the coffee, whether for your customers or for yourself at home.

Same as the espresso cups, there are a few different materials that you can get, however, with the latte size being around 8 fluid ounces, it limits the types of materials that are comfortable to hold at this size. You would usually find that latte cups are commonly made of ceramic, porcelain, or stoneware. These materials provide good insulation and heat retention properties.

The thickness of the ceramic plays a role in heat retention. Thicker walls such as those found at Starbucks, can help keep your latte hot for a longer time, allowing you to enjoy it at a leisurely pace. On the other hand, cups with thinner walls like the ones found at Nero may enhance the tactile experience, allowing you to feel the warmth of the latte through the cup.

Our Favourite Barista Latte Cups

Loveramics
Bodum
Kinto
Kinto Ceramic

The Heat Retaining Benefits of Different Materials

The choice of cup material plays a significant role in maintaining the temperature of your coffee. Here are some commonly used materials and their heat-retaining properties

  1. Ceramic Cups: Ceramic cups, often made from porcelain or stoneware, are renowned for their excellent heat retention. They help keep your coffee hot for a more extended period, allowing you to savour each sip. Additionally, ceramic cups provide an enjoyable drinking experience due to their smooth texture and elegant designs. 
  2. Double-Walled Glass Cups: Double-walled glass cups are a popular choice for those who appreciate both aesthetics and functionality. The dual-layered construction provides excellent heat insulation, keeping your coffee hot while keeping the exterior cool to the touch. These cups also offer a visually stunning experience, as the transparent walls showcase the rich colours of your coffee. 
  3. Stainless Steel Cups: Stainless steel cups excel in heat retention and durability. They are an excellent option for those who prioritise longevity and want their coffee to stay hot for extended periods. Stainless steel cups are also resistant to breakage, making them ideal for outdoor use or for those who desire a more robust coffee-drinking experience. 

Exploring Originality: Specialist Pottery Companies:

For coffee aficionados seeking a unique and artisanal touch, specialist pottery companies offer a wide range of handmade coffee cups. These companies often prioritise craftsmanship, using traditional techniques and distinctive materials to create one-of-a-kind pieces. By opting for pottery cups, you not only enjoy the heat-retaining properties but also own a truly original and handcrafted work of art, you’re supporting an artisanal and artistic approach and supporting local. Look for local pottery companies and I’m sure you’ll find some beautiful hand thrown, home glazed barista quality espresso cups.


Elevate Your Residential Development Launch with AM Espresso

The launch of a new residential development is a significant event, marking the culmination of countless hours of planning, construction, and fine-tuning of details. It is the developer’s opportunity to present the final product – not just houses or apartments, but potential homes – to the public.

Therefore, it is vital to create an atmosphere that is both memorable and sophisticated at these launches. A memorable atmosphere ensures that your development stands out in the minds of potential homebuyers, investors, and real estate agents. It’s about creating an experience that attendees will continue to talk about long after the event.

This not only helps to generate buzz and interest around your development but also positions your brand as one that values quality and attention to detail. Meanwhile, a sophisticated atmosphere signals professionalism and high standards.

It shows attendees that no stone has been left unturned in the pursuit of excellence – from the design and construction of the homes right down to the launch event itself.

A sophisticated atmosphere is more likely to attract high-end buyers and reputable investors, as it aligns with their expectations of quality. Creating such an atmosphere involves meticulous planning and consideration of every aspect of the event, from the venue decor to the quality of refreshments served.

And this is where a service like AM Espresso comes in. With our high-quality specialty coffee and snacks, served from our unique mobile coffee van, we can contribute significantly to setting the right tone for your residential development launch.

Who are we? And Why Should Our Humble Little Van Attend Your Opening?

Introducing AM Espresso, your premium coffee solution for residential development launches, brought to you from Pascal, our vintage yet fully functional and self sufficient, 50-year-old HY Van. As you unveil your meticulously designed residential spaces, we complement your efforts by creating a warm, welcoming atmosphere with our quality services.

Our offerings go beyond just serving coffee. We provide a comprehensive suite of services that can be tailored to suit the scale and nature of your launch event. Here’s what we bring to the table:

Mobile Specialty Coffee Barista: Our expert barista service in Kent ensures your guests are served with hot or cold coffee beverages of their choice. Our range of specialty coffees not only caters to all tastes but also adds an element of sophistication to your event.

Mobile Bartender and Mixology: Planning an evening launch or a grand opening event? Our mobile bartender and mixology services are at your disposal. We can serve a range of alcoholic beverages, helping to create a relaxed and engaging environment for your guests.

Tuck and Snack Shop: Alongside our beverages, we can provide a selection of snacks to keep your guests refreshed and satisfied throughout the event, from freshly baked pastries to a selection of cakes and cookies.

Welcome Drinks and Photo Opportunities: Make an unforgettable first impression with our welcome drinks. Pascal, with its vintage charm, also provides a unique backdrop for photo opportunities, adding an element of fun and nostalgia to your event.

TV and Film Spots: Our van is not just functional, but also a piece of history. Its vintage charm is perfect for creating a unique and captivating aesthetic at your launch event, and it can even serve as a prop for promotional videos or photoshoots.

New Housing Developments Everywhere

As the housing market continues to grow, with new housing developments springing up on every corner, it’s crucial to stand out from the crowd. The way you present and introduce your new development, community buildings, or parks can significantly impact the perception and success of your project. Here’s how AM Espresso can help you differentiate your launch events:

Creating a Unique Experience: AM Espresso adds a unique element to your launch events with Pascal, our vintage 50-year-old HY Van. Serving specialty coffee and a variety of snacks from a vintage van creates an atmosphere that is both sophisticated and memorable.

High-Quality Refreshments: Our high-quality coffee, snacks, and beverages are sure to impress your guests. We offer a range of products to cater to all tastes and dietary requirements, ensuring that every guest feels valued and catered for.

Interactive Elements: The process of brewing and serving coffee becomes an interactive experience with AM Espresso. Guests can watch as our skilled baristas prepare their drinks, adding an element of theatre to the event.

Adding a Personal Touch: From the welcoming smile of our baristas to the unique photo opportunities with Pascal, we provide a personal touch that goes a long way in creating a positive and lasting impression of your launch event.

Flexibility: We understand that every development and launch event is unique, and we’re able to adapt our services to meet your needs. Whether it’s incorporating welcome drinks, offering a mobile bartender and mixology services, or accommodating specific dietary needs, we’re committed to ensuring our service complements your event perfectly.

Photogenic Aesthetic: Pascal, with its vintage charm, serves as a great backdrop for photos. Encouraging guests to take photos adds an interactive element to your event and results in free publicity as guests share their experiences on social media.

By incorporating these elements into your launch event, you’ll be able to create an engaging and memorable experience that sets your housing development apart from the rest.

How to book

Booking AM Espresso for your residential development launch or any other event is a simple and straightforward process. Here’s how you can secure our unique and professional services:

1. Contact Us: Reach out to us with your event details. You can do this by: – Visiting and filling out the contact form – Sending us an email at contact@makeespresso.co.uk – Calling us directly at 07428580556 

2. Discuss Your Requirements: Once we receive your query, we’ll get in touch to discuss your specific needs. This will include the date and time of your event, the expected number of guests, and any special requests or requirements you might have. 

3. Receive a Custom Quote: Based on your requirements, we will provide a detailed quote for our services. This will outline what’s included, such as the number of serving hours, the menu, and any additional services requested. 

4. Confirm Your Booking: If you’re happy with the quote, you can confirm your booking by signing a contract and making a deposit payment. The contract will cover all the details and terms of our service, ensuring there are no surprises on the day of the event. 

5. Enjoy AM Espresso at Your Event: On the day of the event, we’ll arrive in plenty of time to set up and start serving delicious coffee and snacks to your guests. We’re committed to providing a seamless and stress-free booking experience, and we’re always on hand to answer any questions or concerns you might have along the way. Reach out to us today and let’s elevate your residential development launch with AM Espresso!

Ethiopian Coffee Conundrum: Balancing Ethics, Supporting Development, and Savouring Flavours

I’ve always been fascinated by Ethiopian coffee, not only for its incredible flavours but also because it is often regarded as the birthplace of coffee itself. This rich history adds a layer of intrigue. Yet, I wrestle with the importance of addressing the ethical implications surrounding coffee production in a developing country like Ethiopia. In this article, we’ll explore the complex world of Ethiopian coffee, delving into the unique characteristics that make it so special, while also taking a closer look at the social, economic, and environmental challenges it faces.

Throughout our journey, we’ll discuss various aspects of the coffee industry, from farming practices and processing techniques to the role of sustainability and fair trade initiatives. Our goal is to provide a comprehensive understanding of Ethiopian coffee, and by doing so, encourage a more informed and conscious approach to coffee consumption.

To help you make ethical choices while enjoying the remarkable flavours of Ethiopian coffee, we’ll also share some recommendations for ethically sourced Ethiopian coffee beans towards the end of the article. So, grab a cup of your favourite brew, and let’s embark on this enlightening journey together.

Coffee Production in Ethiopia

Coffee plays a crucial role in Ethiopia’s economy, accounting for approximately 3% of the country’s Gross Domestic Product (GDP). As the largest exporter of coffee in Africa and the 5th largest coffee producer in the world, Ethiopia’s coffee industry significantly contributes to the nation’s economic development (World Bank, 2021).

Ethiopia produces around 7.5 million bags (60 kg each) of coffee per year, with about 3.5 million bags being exported globally (International Coffee Organization, 2021). The majority of the coffee is grown by smallholder farmers, who cultivate the crop on approximately 4 million hectares of land, providing a livelihood for nearly 15 million Ethiopians. This means that the coffee industry supports around 15% of the country’s population directly or indirectly.

The Ethiopian Commodity Exchange (ECX), established in 2008, serves as a platform for coffee farmers to sell their produce through a standardised procedure. While the ECX has helped streamline the coffee trade, it has also faced criticism for making it difficult to trace coffees back to specific farms, which is important for specialty coffee roasters. In response, the Ethiopian government introduced new policies in 2017 to enable greater traceability and direct trade between farmers and buyers.

Ethiopia’s coffee industry is not without challenges. Climate change, pests, and diseases threaten the crop’s production, while farmers often grapple with low productivity and limited access to resources. To address these issues, various organizations, such as USAID and Fair Trade, are working to promote sustainable coffee production, improve farmers’ access to resources, and enhance the overall resilience of the sector.

Trademarking of Ethiopian Coffee Regions

Ethiopia has trademarked its coffee regions to protect and promote the unique qualities, reputation, and value of its coffee varieties in the global market. The country’s coffee varieties, such as Sidamo, Yirgacheffe, and Harrar, are highly sought after by specialty coffee enthusiasts and roasters worldwide. By trademarking these regional names, Ethiopia aims to achieve several objectives:

  1. Protect regional identity: Trademarking coffee regions helps to preserve the distinct identity of Ethiopian coffee varieties, ensuring that only coffee produced in these regions can be labeled and sold under the respective regional names. This measure prevents mislabeling and misrepresentation of the origins of the coffee. 
  2. Enhance traceability: Trademarking enables better traceability of Ethiopian coffee, allowing buyers and consumers to know precisely where their coffee comes from, ensuring its authenticity and supporting the claims about the beans’ unique flavour profiles and growing conditions. 
  3. Increase value: By protecting the regional identity and traceability of Ethiopian coffee, the country can better position its coffee varieties in the high-value specialty coffee market. This strategy can result in higher prices for Ethiopian coffee, benefiting local farmers and the country’s economy. 
  4. Support local coffee farmers: Higher prices and recognition of the unique qualities of Ethiopian coffee can lead to better income for coffee farmers, incentivizing them to invest in sustainable farming practices and maintain the high quality of their coffee. 
  5. Promote Ethiopian culture: The trademarking of coffee regions also serves to promote Ethiopian culture and tradition, as coffee is deeply embedded in the country’s social and cultural fabric. By marketing their coffee varieties and their unique characteristics, Ethiopia shares its rich coffee history and heritage with the world.

History of Coffee in Ethiopia

Ethiopia is widely considered the birthplace of coffee, and it is home to Coffea arabica, the most popular and widely consumed coffee species globally. The country boasts a rich history and numerous legends surrounding the origin and discovery of coffee.

The wild coffee forests of Ethiopia are the genetic origin of the Coffea arabica plant, which now represents about 60% of global coffee production. Ethiopian coffee is known for its diverse range of flavours and aromas, which can be attributed to the unique growing conditions in various regions, such as Sidamo, Yirgacheffe, and Harrar.

One of the most famous legends is the story of Kaldi, a goat herder from the 9th century. According to the tale, Kaldi noticed that his goats became particularly energetic and almost danced after eating the red cherries from a specific tree. Intrigued by this discovery, Kaldi took the cherries to a local monastery, where the monk dismissed them as the work of the devil and threw them into the fire. As the cherries burned, they released a pleasant aroma, which led to the beginning of coffee roasting and brewing.

Although the story of Kaldi and his dancing goats is more folklore than fact, historical records suggest that coffee consumption indeed started in Ethiopia. Indigenous tribes in the region initially consumed coffee cherries as a stimulant by mixing them with animal fat. Over time, the practice of roasting and brewing coffee beans spread to the Arabian Peninsula, and from there, it expanded across the world.

Throughout history, coffee has remained an integral part of Ethiopian culture. The Ethiopian coffee ceremony, an essential social event and a symbol of hospitality, is still practiced today. The ceremony involves roasting, grinding, and brewing coffee beans in a traditional clay pot called a jebena.

Ethiopian Coffee Regions and Varietals

Ethiopia has several distinct coffee-growing regions, each producing unique flavors and varietals due to their specific growing conditions, altitude, and processing methods. Some of the most well-known Ethiopian coffee regions include:

Sidamo Region

Yirgacheffe

Guji

Harrar

1. Sidamo (or Sidama): Located in the south of Ethiopia, Sidamo is one of the country’s largest coffee-producing regions. The high altitude, fertile soil, and favourable climate contribute to the production of high-quality Arabica coffee. Sidamo beans are known for their bright acidity, medium body, and complex fruity and floral flavours. Some common tasting notes include citrus, berries, and floral undertones.

2. Yirgacheffe: Yirgacheffe is a small town within the Sidamo region and is famous for producing some of the best coffees in the world. The coffee beans from Yirgacheffe are typically wet-processed, resulting in bright acidity, light body, and sweet fruity and floral flavours. Common tasting notes include jasmine, bergamot, and tropical fruits.

3. Guji: Guji is another area in the southern part of the Sidamo region that produces exceptional coffee beans. Guji beans are sought after by specialty coffee roasters for their unique flavour profile, which often features sweet floral notes, such as jasmine, alongside fruity flavours like melon and peach, and a tea-like body.

4. Harrar: Harrar is situated in the eastern part of Ethiopia, and the region is known for its dry-processed coffee. Harrar beans exhibit a winey character, wild fruit flavours, and a syrupy body. Sometimes, you may find Ethiopian Harrar coffee labelled as Mocha Harrar, a reference to the historical Red Sea port from which some of the finest coffees in the world (including those from Yemen) were shipped.

Each of these Ethiopian coffee regions produces distinct varietals and flavours, which are highly valued by coffee enthusiasts worldwide. The combination of diverse growing conditions, traditional processing methods, and a strong coffee heritage make Ethiopian beans truly unique and special, and not going anywhere, with this study showing that the suitable regions for specialty coffee will only grow larger as the climate changes.

Trademarking the regions

Ethiopia, in a totally rock and roll move, has trademarked their coffee regions to protect the unique characteristics and reputation of their coffee and to support the farmers who grow it. By trademarking the names of the coffee regions, such as Yirgacheffe, Sidamo, and Harrar, Ethiopia has successfully branded their beans on the world market, and paved the way for increased traceability and a better life for the 15 million Ethiopians working in the coffee industry. Much to the disdain of Starbuck who have fought the trademarking at every turn claiming it would damage their already immense profiteering and tax dodging operations.

But that doesn’t affect the fact that these days, Ethiopia is one Roasters are getting hold of really interesting batches from Microlots across, and you can still find some of the real juicy and light flavours that these regions are known for, by choosing a brewing technique that is suitable to the beans.

Best Brew Methods for Ethiopian Coffee

Whilst we do appreciate the traditional methods of the coffee ritual in Ethiopia, we find to get the most out of Ethiopian coffee beans and retain their juicy, light flavours while minimizing the bitterness from the oils, there are several brewing methods you can use:

1. Pour-Over: The pour-over brewing method, using devices like the Hario V60 or Chemex, allows for excellent control over the extraction process. Using a medium-coarse grind and a steady, slow pour, you can highlight the fruity and floral notes while avoiding over-extraction. The Chemex, with its thicker paper filter, can produce a clean, tea-like body, while the V60’s thinner filter allows for a slightly more syrupy mouthfeel.

2. Aeropress: The Aeropress is another suitable brewing method for Ethiopian beans, allowing for a clean and well-rounded cup. Using a medium-fine grind and a shorter brew time (around 1-2 minutes), you can extract the fruity and bright flavours while keeping the bitterness in check. Invert the Aeropress to allow for full immersion brewing, and then press gently to achieve a smooth, balanced cup.

3. Automatic Drip: Although an automatic drip coffee maker might not offer the same level of control as a pour-over, it can still produce a great cup of Ethiopian coffee. Using a medium grind and fresh, recently roasted beans, you can achieve a well-balanced, flavourful brew. The paper filter will help maintain clarity in the coffee, allowing for the bright acidity and light body to shine through.

4. Cold Brew: Ethiopian beans, with their fruity and floral notes, make for a delightful cold brew. Coarsely grind the beans and steep them in cold water for 12-24 hours. The resulting cold brew will be smooth and refreshing, with prominent notes of blueberry, peach, or other fruity flavours, depending on the specific bean. The slow, cold extraction process will minimize bitterness and create a balanced, enjoyable cup.

When brewing Ethiopian coffee, the key is to focus on highlighting the unique flavour characteristics of the beans while avoiding over-extraction. By using the appropriate brewing method and paying attention to grind size, water temperature, and brewing time, you can enjoy the best that Ethiopian beans have to offer.

Our Favourite Ethiopian Coffee Beans

Here’s our selection of the top Ethiopian coffee beans you can find at the moment;

Coffee World Yirgacheffe

This coffee, with its light roast and special processing, has a clean and subtle taste when paired with pour over brewing. The light mouth feel leaves notes of lime, black tea, and just a touch of raspberry sweetness. It’s a really pleasant coffee experience for those who appreciate delicate and nuanced flavours.


Gingerbread Espresso Martini: A Festive Twist on a Classic Cocktail

You may be searching for a delightful cocktail to add a touch of elegance to your celebrations. Something we came across when experimenting with our very own home made syrups. Allow us to introduce you to the Gingerbread Espresso Martini, a classic favourite with a twist on the classic espresso martini recipe that we use in in the van and at home, that guarantees to impress your guests. This delectable concoction combines the rich, coffee-infused flavours of the traditional espresso martini with the comforting aroma and taste of gingerbread.

The blending of these two distinct profiles creates a harmonious and luxurious libation—a perfect addition to your festive repertoire. To create this tantalising Gingerbread Espresso Martini, you will require a few key ingredients, some essential tools, and a little bit of technique. In no time, you’ll be sipping on a velvety smooth, spiced masterpiece that elevates your cocktail-making skills to new heights.

What is an Espresso Martini?


An espresso martini is a popular cocktail that combines the rich flavours of coffee and vodka with a touch of sweetness. This delightful drink is known for its invigorating taste, smooth texture, and elegant presentation. It’s the perfect pick-me-up when you’re looking for an exciting twist on your usual caffeine fix. Created in the 1980s by British bartender Dick Bradsell, the espresso martini was initially called the “Vodka Espresso.” Bradsell invented the drink in response to a customer’s request for a cocktail that would “wake her up and —- her up.” The name “espresso martini” emerged later, as the drink gained popularity and bartenders around the world started creating their own unique variations. An authentic espresso martini recipe typically includes the following ingredients:

  •  Freshly brewed espresso
  • Vodka
  • Coffee liqueur
  • Simple syrup or sugar

To make an espresso martini, you’ll need to start by brewing a fresh shot of espresso. Once you have your coffee ready, combine the espresso, vodka, coffee liqueur, and syrup or sugar in a cocktail shaker filled with ice. Shake the mixture vigorously until it’s well combined and frothy. Finally, strain the drink into a chilled martini glass and garnish with three coffee beans for a touch of elegance. The gingerbread espresso martini is a festive twist on the classic drink. It incorporates gingerbread syrup or gingerbread-infused vodka, adding a warm, spicy flavour that perfectly complements the rich coffee notes. This delightful variation is sure to become a favourite during the holiday season or any time you’re craving a comforting, indulgent treat.

Why Gingerbread?


One might wonder why gingerbread is a popular choice when it comes to making espresso martinis. The first key reason for its popularity is the delightful flavour combination. Gingerbread offers a warm, spicy taste that perfectly complements the strong and slightly bitter notes of the espresso. Additionally, the sweetness of the gingerbread balances the drink, creating a well-rounded and satisfying cocktail that appeals to your taste buds.

The gingerbread flavour also serves as an inviting reminder of festive seasons and celebrations. Its nostalgic essence evokes memories of holiday gatherings or winter evenings curled up by the fire. By incorporating gingerbread into an espresso martini, you can experience these warm, nostalgic sensations all year round.

Gingerbread and coffee have long been a winning pair, so it’s no surprise that the fusion of these two elements in an espresso martini delivers such an exceptional result. The spiciness of gingerbread, derived from ingredients like ginger, cinnamon, and cloves, harmonises with the rich, bold flavours of coffee to create a cocktail that is both enticing and comforting. Moreover, the texture of gingerbread lends itself well to this innovative twist on the classic espresso martini. The thick, syrupy consistency can enhance the mouthfeel of the drink, adding a smooth, velvety richness without overpowering the espresso’s natural texture.

So, there you have it – gingerbread ticks all the right boxes when it comes to creating a memorable and captivating espresso martini. Its flavour profile, nostalgic charm, synergy with coffee, and appealing texture make it a true standout ingredient in the world of inventive cocktails. Next time you order or prepare an espresso martini, don’t hesitate to give gingerbread a try and experience its delightful impact.

Gingerbread Espresso Martini Ingredients

Before diving into making a delightful Gingerbread Espresso Martini, it’s crucial to gather all the essential ingredients. Each component plays an integral role in crafting a flavourful and enjoyable cocktail.

Vodka

You’ll need a high-quality vodka to ensure a smooth profile in your Gingerbread Espresso Martini. A 50ml measure will suffice, but feel free to adjust the quantity to your taste preferences.

Coffee Liqueur

A delicious coffee liqueur is vital for adding depth and richness to your cocktail. Use a 25ml serving in your recipe, which will perfectly balance the espresso and gingerbread notes.

Espresso

For an authentic and robust coffee flavour, freshly brewed espresso is essential. It’s best to use a double shot of espresso using freshly ground beans and ensure that it’s cooled slightly before incorporating it into your cocktail.

Gingerbread Syrup

This key ingredient gives your martini its unique, festive twist. Finely blend 15ml of gingerbread syrup into your cocktail, making sure it is not overpowering. Consider playing around with the sweetness by adding more or less syrup to suit your preferences.

Garnishes

Garnishing your Gingerbread Espresso Martini not only enhances the visual appeal but also adds extra flavour. Consider using any of the following to complete your cocktail:

  • A sprinkle of cocoa powder or a dusting of grated dark chocolate
  • A gingerbread biscuit balanced on the rim of the glass
  • A few espresso beans for a touch of sophistication

Now that you’ve got all your ingredients and garnishes ready, you’re all set to create your ideal Gingerbread Espresso Martini.

How To Make A Gingerbread Espresso Martini

In this section, you’ll learn how to create a delicious gingerbread espresso martini, perfect for festive occasions. Follow the simple steps divided into three sub-sections: Preparation, Shaking and Straining, and Serving.

Preparation

First, gather all the necessary ingredients and tools:

  •  50ml vodka
  • 35ml coffee liqueur
  • Double shot of espresso (freshly made and cooled)
  • 10ml gingerbread syrup
  • Ice
  • Cocktail shaker
  • Strainer
  • Martini glass
  • Grated gingerbread and whipped cream for garnishing (optional)

Before you begin, make sure you have a clean work surface and all your utensils are ready for use.

Now to Shake

Now that your ingredients and tools are prepared, follow these steps:

  1.  Fill the cocktail shaker with ice up to the halfway point.
  2. Pour the vodka, coffee liqueur, espresso, and gingerbread syrup into the shaker.
  3. Close the shaker and shake vigorously for a good 15-20 seconds, or until well mixed and chilled.
  4. Place the strainer on top of the shaker, ensuring it’s well-seated to prevent any spills.
  5. Hold the shaker firmly with one hand and the strainer with the other hand while straining the mixture into your martini glass.

Serving your Gingerbread Espresso Martini

With your gingerbread espresso martini successfully strained into the glass, it’s time for the finishing touches:

  • If you’d like to garnish with grated gingerbread, gently sprinkle it on top of the martini.
  • For a more indulgent option, you can add a dollop of whipped cream on top.

Variations on a Gingerbread Martini

If you’re looking to add a twist to your gingerbread espresso martini, consider trying different gingerbread syrup variations. There are numerous ways to customise your syrup, so you can find the perfect flavour to suit your tastes. Begin by experimenting with the sweetness levels of your gingerbread syrup. If you prefer a sweeter profile, you can increase the amount of sugar or use a mix of brown and white sugars. Alternatively, for a less sweet syrup, simply reduce the sugar content. Play around with the spices used in your syrup as well. Traditional gingerbread blends often include ginger, cinnamon, nutmeg and cloves, but you might want to adjust the ratios to your liking. For example, if you enjoy a spicier taste, increase the ginger and add a pinch of ground black pepper. In addition to the classic gingerbread spices, you can explore other flavours that complement gingerbread’s warm and comforting profile. Consider adding a touch of vanilla extract, orange or lemon zest, or even a splash of dark rum for an extra layer of depth and complexity. Finally, feel free to get creative with garnishes that pair well with your chosen gingerbread syrup variation.

Some ideas include:

  • Chocolate shavings or cocoa powder dusting on top of the martini
  • Crushed gingerbread biscuits or gingersnap crumbs around the rim
  • Thinly sliced fresh ginger or a cinnamon stick for stirring
  • Whipped cream topping with crushed gingerbread or a drizzle of caramel sauce

Remember, the key is to have fun and explore different flavour combinations until you discover the perfect gingerbread syrup variation that elevates your espresso martini to new heights.


How to Make Shaken Espresso at Home: The Ultimate Guide

Shaken espresso has become a popular trend in the world of coffee thanks to Starbucks offering it in America, offering a refreshing alternative to your classic home made latte or iced coffee. The aeration of the espresso and the crema reacts in a way that creates a frothy and enjoyable cold drink on a hot summer day. With its intriguing combination of espresso shots, a touch of home made syrup, and either milk for a latte type drink or water for Americano, shaken espresso provides a delightful balance of bold and smooth flavours.

The process of shaking the ingredients together not only introduces aeration but also creates a delicate, frothy texture that enhances the overall experience. Whether you’re a seasoned coffee enthusiast or simply looking to try something new, shaken espresso is certainly worth a taste. Keep reading to learn more about this delightful concoction, and discover how you can create your own perfect shaken espresso experience at home or at your favourite café.

What Is Shaken Espresso?

Shaken espresso is a delightful, refreshing coffee beverage that you can easily prepare and enjoy. It involves shaking espresso and other ingredients, such as ice and sometimes sweeteners, to create a smooth, frothy, ice-cold delight. This popular caffeinated concoction may be enjoyed simply by combining espresso with ice, or you can elevate it by adding elements such as sugar, flavoured syrups, milk or cream. It is a versatile and delectable choice for coffee enthusiasts seeking a cool and revitalising beverage during warm weather or any time of year. Prepare a shaken espresso with the following steps:

  1. Prepare a freshly brewed espresso using your preferred method.
  2. For a sweeter option, add sugar, honey or your desired syrup to the hot espresso.
  3. Fill a cocktail shaker or a jar with a tightly fitting lid half full of ice cubes.
  4. Pour the espresso into the shaker, along with any additional flavourings, if desired.
  5. Close the lid securely and shake vigorously for 15-20 seconds or until the mixture is frothy and icy cold.
  6. Strain the shaken espresso into an empty glass and savour your intriguingly effervescent and chilled treat.

This technique creates an indulgent experience, as the shaking process aerates the espresso and transforms its texture into a velvety and invigorating delight. Whether you’re an experienced barista or just a passionate home brewer, you’ll find that a shaken espresso is a splendid way to perk up your daily coffee routine.

Ingredients and Equipment

In order to make shaken espresso, gather the following ingredients and equipment:

  • Espresso beans
  • Water
  • Iced milk of your choice
  • Sweetener, if desired
  • Ice cubes

Ensure you have these necessary pieces of equipment:

  • Espresso machine or Moka pot
  • Shaker or mason jar with a tight lid
  • Measuring spoons
  • Glass or cup for serving
Simple cocktail shaker

Start by selecting high-quality espresso beans for a richer flavour. The beans should be fresh, and you’ll notice richer aromas and taste if you grind them right before brewing. When it comes to water, using filtered water makes a significant difference in the final result, as tap water can sometimes introduce off-flavours. You can choose your preferred milk for this recipe – dairy or non-dairy alternatives work well. Consider options like oat milk, soy milk, or almond milk to accommodate allergens and taste preferences.

Shaken Espresso Variations

As an espresso enthusiast, you might be intrigued to try different variations of shaken espresso. Let’s explore some popular versions which include Iced Shaken Espresso and those made with alternative milks.

Iced Shaken Espresso

An Iced Shaken Espresso is a refreshing and delightful twist on the classic espresso. It’s perfect for warm, sunny days when a hot coffee just doesn’t hit the spot. To make an Iced Shaken Espresso, follow these simple steps:

  1. Prepare a standard espresso shot.
  2. Pour the hot espresso into a shaker filled with ice.
  3. Shake the mixture vigorously until chilled.
  4. Strain the shaken espresso into a glass filled with fresh ice.
  5. Top it off with a splash of cold water or a light dairy or non-dairy milk.

You can also customise your Iced Shaken Espresso with flavourings like caramel, vanilla, or hazelnut for an extra burst of taste.

With Alternative Milks

For those who prefer plant-based or lactose-free alternatives, there are plenty of milk options available to create a delicious shaken espresso. Some popular choices include:

  • Almond milk
  • Oat milk
  • Soy milk
  • Coconut milk

Each of these alternative milks provides its unique flavour profile and texture, so you can experiment to find the perfect match for your shaken espresso. Similarly, to create a shaken espresso with your chosen alternative milk, prepare an espresso shot, pour it into a shaker with ice, add your desired milk, and shake before straining into a glass.

How do you Shake the Espresso?

To make a shaken espresso, you will need a shaker, some ice, your freshly brewed espresso, and any additional ingredients you prefer, such as a sweetener or milk. Start by brewing your espresso using your preferred method. Once it’s ready, set it aside and let it cool slightly. Meanwhile, prepare your shaker by filling it with ice. Add the cooled espresso to the shaker, along with any sweetener if you’re using one.

If you want to create a creamier texture, consider adding a splash of milk or a milk substitute. Next, firmly secure the lid on your shaker and vigorously shake the mixture for 15-20 seconds. You’re aiming to combine and chill the ingredients while creating a frothy, aerated texture. After shaking, carefully remove the lid and pour your shaken espresso into your chosen glass. For an optimal visual effect, use a clear glass that showcases the layers and frothiness of the drink. Finally, top it off with a few extra ice cubes if desired and enjoy! Here are a few tips and variations to consider for your shaken espresso:

  • Experiment with different sweeteners, such as simple syrup, agave nectar, or maple syrup
  • Infuse your drink with flavour by adding a hint of vanilla or almond extract
  • Create a dairy-free version with almond, coconut, or oat milk
  • Give it a refreshing twist by adding a splash of sparkling water or tonic

Brewing Techniques

In this section, you’ll learn about essential brewing techniques that will help you master the art of making shaken espresso. We will cover how to make an espresso at home and compare cold brew and hot brew methods.

How to Make an Espresso At Home

Preparing espresso at home is a delightful experience, and with the right tools and techniques, you can enjoy your café-style coffee. Here’s a quick guide:

  1. Get the right equipment: Invest in a good quality espresso machine and a burr grinder for precise grinding of the coffee beans.
  2. Choose fresh coffee beans: Opt for high-quality, freshly roasted beans to get the best flavour in your espresso.
  3. Grind the coffee beans: Grind the beans to a fine consistency, similar to the texture of powdered sugar.
  4. Measure and tamp the coffee grounds: Use about 18 grams of ground coffee for a double espresso shot, then gently tamp the grounds using a coffee tamper to provide even extraction.
  5. Brew the espresso: Start the machine and let the water flow through the grounds under pressure, extracting rich, bold flavours. It should take around 25-30 seconds to pull a perfect double espresso shot.

Now you’re all set to create your shaken espresso. Fill a shaker with ice, pour in the freshly brewed espresso, add sweetener if desired, and shake vigorously. Strain the mixture into a glass and enjoy!

Cold Brew Vs Hot Brew

When it comes to brewing coffee, the temperature at which you prepare your coffee plays a significant role in the overall taste and flavour profile. Let’s compare cold brew and hot brew methods:

Method Flavour Profile Brewing Time
Cold Brew Smoother and less acidic compared to hot brew, with a natural sweetness from the coffee beans 12-24 hours
Hot Brew Brighter, more pronounced acidity and a stronger presence of volatile compounds, providing a robust and complex flavour experience 4-5 minutes

Experiment with both brewing methods and find which one suits your taste preferences. Remember that for a shaken espresso, you’ll need to start with a hot brew and then shake it with ice to make a refreshing iced coffee.

Popular Recipes and Tips

When you want to prepare shaken espresso, there are a few popular recipes and tips to keep in mind. To create a flavourful and refreshing drink;

1. Classic Shaken Espresso: Combine a double shot of freshly brewed espresso with a teaspoon of sugar or sweetener of your choice. Add ice and shake it in a cocktail shaker until well mixed and chilled. Strain into a glass and serve with a splash of cold water or a twist of lemon.

2. Shaken Espresso with Milk: Create a creamy version by adding a splash of cold milk (dairy or non-dairy) to your shaken espresso mixture before shaking. Adjust the sweetness according to your taste preferences.

3. Iced Chocolate Shaken Espresso: Add a generous scoop of chocolate ice cream or powder to your espresso before shaking. This adds a touch of indulgence and creates a dessert-like drink.

To ensure your shaken espresso is perfect every time, follow these tips:

  • Select high-quality, freshly roasted coffee beans for the best espresso.
  • Brew your espresso just before shaking to retain the fresh, bold flavour.
  • Use a good-quality cocktail shaker with a tight seal to prevent spills and ensure a thorough mix.
  • Experiment with different syrups and mix-ins to create new, unique flavour combinations.

With these recipes and tips, you can enjoy a delicious shaken espresso at home and share your new-found skill with friends and family. Enjoy!

Shaken Espresso FAQ

What is a shaken espresso?

A shaken espresso is a delightful, refreshing coffee beverage that combines espresso shots, ice, and other ingredients such as sweeteners or milk. The ingredients are shaken together, resulting in a frothy, aerated texture that provides a unique twist on traditional coffee drinks.


What container can I use to shake an espresso?

To shake an espresso, you can use a cocktail shaker or a mason jar with a tight-fitting lid. Both options will help create the desired frothy, aerated texture when shaking the espresso and other ingredients together.


Is a shaken espresso the same as an espresso martini?

No, a shaken espresso and an espresso martini are different. While both beverages involve shaking espresso with ice, an espresso martini is a cocktail that typically includes vodka, coffee liqueur, and sometimes simple syrup. On the other hand, a shaken espresso is a non-alcoholic coffee drink that can be enjoyed with or without sweeteners and milk.


Victoria Arduino Mythos One Review – One Year On

In my pursuit of specialty coffee perfection, I recently upgraded from a Eureka Zenith doser grinder to the renowned Mythos One. This transition has proven to be invaluable, as the Mythos One not only delivers an incredibly consistent grind but also demonstrates remarkable speed. These attributes have rendered it an ideal fit for my off-grid specialty coffee van (available for weddings), where precise control over various factors is of paramount importance.

After a year of use, I’m in a good position to review it, as there are things it obviously excels at, and some things you’d expect better from a £2.5k commercial grinder. Overall I will say it’s an amazing grinder and perfect for my setup, but read on to see if it will suit you.

About the Victoria Arduino Mythos One

You might have already read a lot about the Mythos one, but to summarise the grinder, it is It’s an on-demand grinder that’s all about making life easier for coffee pros by delivering consistently great grinds and a more comfortable user experience. With features like the Clima Pro technology to keep temperatures just right and the Clump Crusher system to make sure your coffee grounds are as smooth as possible, it’s no wonder people are loving this grinder.

As for Victoria Arduino, they’re known for creating some seriously cool coffee gear. The Victoria Arduino brand was acquired by the Simonelli Group in the early 2000’s and have released the Mythos One under both brands, so if you are searching around the web, you may see references to both. The Mythos One is just one example of how they’re all about making great coffee even greater. By focusing on what baristas and coffee lovers need, they’ve created a coffee grinder that’s not only a handy tool but also a game-changer for anyone looking to up their coffee game. My goal was to improve my espresso and the Victoria Arduino Mythos One has enabled that.

My Experience with the Mythos One

Since starting in 2020, I was always been on the lookout for the grinder that would elevate my product. So, when I got my hands on the Mythos One grinder, I was beyond excited to see how it would transform my brewing experience. From its consistency and speed to its unique features and overall performance, the Mythos One promised to be a game-changer for my specialty coffee endeavours. It fits nicely next to my Pavoni Lever Espresso machine and has transformed the way I make coffee. Read on to discover my journey with this exceptional grinder and how it has shaped my pursuit of coffee perfection.

Delivers incredibly consistent grinds

I grind 18grams in usually around 6 seconds

Adaptable for my off-grind setting

Clima Pro Technology when plugged in works great

75mm Burr tilted orientation great for cleaning and maintenance

My experience with the Mythos One has been nothing short of transformative, as it has provided a multitude of positive aspects that have greatly enriched my pursuit of specialty coffee perfection. One of the most significant advantages of this grinder is its ability to deliver incredibly consistent grinds, which is vital for achieving the perfect espresso. When combined with its remarkable speed, the Mythos One has proven to be an invaluable asset in my off-grid specialty coffee van, where precision and efficiency are of the utmost importance.

75mm Burr Set Tilted Orientation

I’m a huge fan of the tilted burr setup found in the Mythos One. The flat burrs offer exceptional access for cleaning, ensuring that the grinder remains in top-notch condition with minimal effort. Additionally, this design results in very little grind retention, which contributes to a more efficient and precise grinding process. Moreover, the easy maintenance aspect of the tilted burr setup is yet another reason why I find it so appealing, as it allows me to focus on perfecting my coffee-making skills without worrying about complicated upkeep.

Power Consumption

The grinder’s adaptability to my power setup has allowed me to tailor its performance to meet the specific needs of my mobile coffee business. This level of customisation ensures that I can consistently provide my customers with the highest quality coffee possible, even in an off-grid setting, which is how I serve coffee most of the time.

The official manual says the wattage on a 240v system is 450, but without the Climacool action, whilst grinding, we use around 350watts with the surge for start-up being hitting 700 watt peak.

Mixed Bag Portafilter Holder

The Mythos One portafilter holder is designed to securely hold a spouted portafilter in place. This hands-free operation feature is a helpful one for busy baristas, as it streamlines the brewing process and allows for increased productivity during peak hours. However, it really only works consistently enough with a spouted portafilter as the spout provides a tension point for the portafilter to stay in place, so a bottomless portafilter will tend to slip out of that position, at best negating the point of being a hands free process, and at worst, causing it to slip and cause coffee grinds to not be deposited into the basket.

Amazing Build Quality

The high-quality construction and robustness of the Mythos One are also noteworthy, as they are indicative of the grinder’s durability and longevity. Its substantial footprint and considerable weight may initially seem like drawbacks, but they are in fact evidence of the machine’s solid build quality. This ensures that the Mythos One can withstand the rigors of daily use, making it an excellent long-term investment for any coffee professional or enthusiast.

The large hopper capacity of the Mythos One, which can hold up to 2 kilograms of beans, is yet another advantage. This feature allows baristas to grind large quantities of coffee without constantly refilling the hopper, resulting in a more efficient workflow

Some Annoyances Waste Management and Portafilter Compatibility

Waste Management and Portafilter Compatibility Although the Mythos One boasts numerous impressive features, it does struggle with waste management, particularly in terms of the chute’s design. The current configuration of the chute causes coffee grounds to be scattered in various directions, which compromises the accuracy of the grind delivery into the portafilter. When striving for a precise 18-gram dose of coffee, the loss of two to three grams due to the chute’s inefficiency can lead to significant waste and inconsistency in extraction.

Moreover, this wastage can have a detrimental impact on profit margins, as the loss of two to three grams per cup quickly accumulates. In the context of a specialty coffee business, where precision and consistency are paramount, this issue can adversely affect customer satisfaction and overall success. To resolve this problem, the chute could be redesigned or repositioned to ensure a more accurate and controlled delivery of coffee grounds into the portafilter. By addressing this concern, the Mythos One could further enhance its reputation as a reliable and indispensable tool for coffee aficionados in their pursuit of the perfect cup.

The portafilter holder itself is a noteworthy feature, as it is designed to securely hold a spouted portafilter in place, allowing for hands-free operation. However, it is not without its shortcomings. In particular, the holder struggles to accommodate bottomless portafilters, which tend to slip away from the auto push button and fail to maintain a level position. This issue exacerbates the aforementioned problem of coffee grounds spilling all over the place.

Is the Mythos One a Good Home Grinder?

The Mythos One grinder, while undeniably exceptional in terms of performance and features, might be considered too large and excessive for home use. Its substantial footprint and considerable weight, as well as its professional-grade capabilities, make it better suited for commercial settings or serious coffee enthusiasts with ample space. For casual home users, this powerful grinder could be perceived as a bit more than necessary, and you might opt for something a little more compact and affordable option that still delivers great results, of which there are plenty home coffee grinder options out there.

Conclusion

In summary, my experience with the Mythos One has been largely positive, as the grinder has significantly improved my ability to achieve specialty coffee perfection. Its consistency, speed, and adaptability to my power setup make it an invaluable asset in my coffee van. While there are a few minor issues with waste management and portafilter compatibility, these drawbacks do not detract from the overall utility of the machine. By addressing these concerns and optimising certain design elements, the Mythos One has the potential to become an even more indispensable tool for coffee enthusiasts in their pursuit of excellence.


Scroll to Top